Tuto pour bien debuté avec la librairie UI de DJI
Getting Started with DJI UI Library
If you come across any mistakes or
bugs in this tutorial, please let us know using a Github issue, a post
on the DJI forum. Please feel free to send us Github pull request and
help us fix any issues.
In this tutorial, you will learn how to use DJI Android UI Library and DJI Android SDK to create a fully functioning mini-DJI Go app easily, with standard DJI Go UIs and functionalities. By the end of this tutorial you will have an app that you can use to show the camera FPV view, check aircraft status, shoot photos, record videos and so on.
You can download the tutorial's final sample code project from this Github Page.
We use Mavic Pro and Nexus 5 as an example to make this demo. For more details of customizing the layouts for iPhone devices, please check the tutorial's Github Sample Project. Let's get started!
Additionally, with the ease of use, UILibrary let you focus more on business and application logic.
As DJI UI Library is built on top of DJI Mobile SDK and VideoPreviewer, you need to use it with them together in your application development.
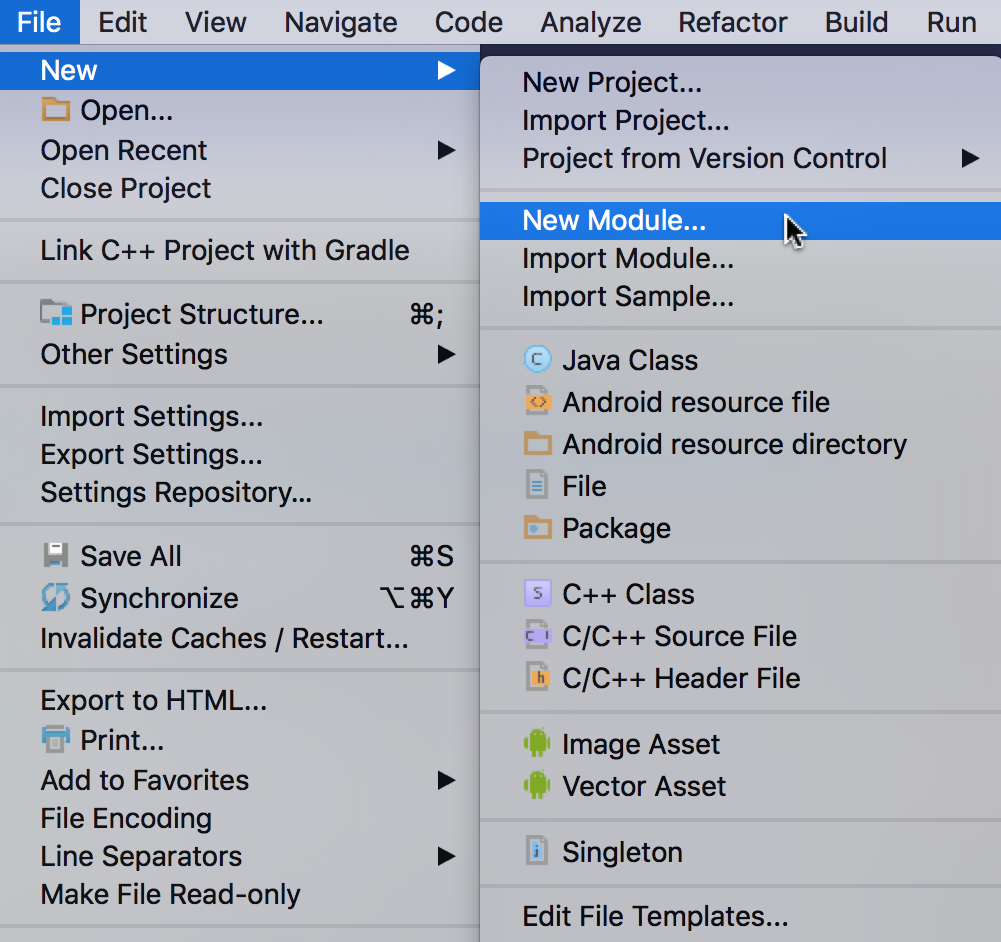
2. Next, download the android-uilib-release.aar file from this Github link. Go to File -> New -> New Module on the Android Studio menu:
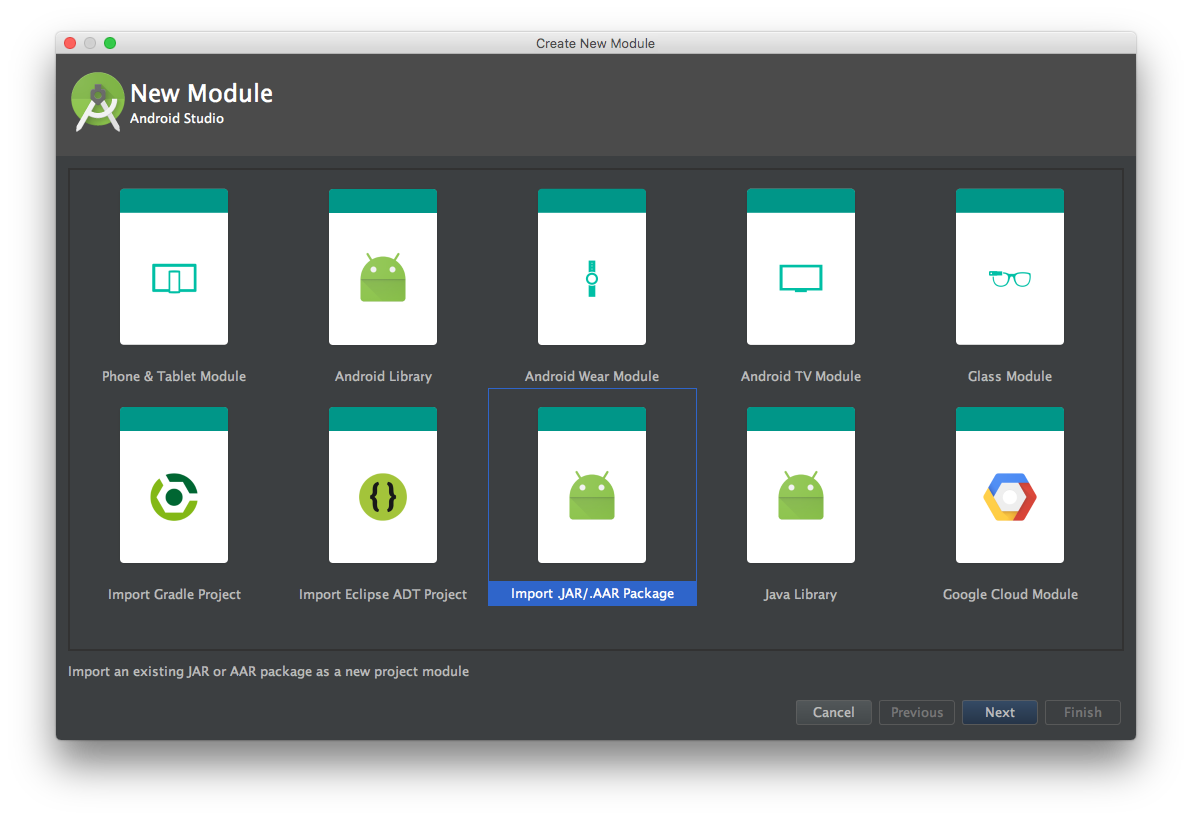
 Choose "Import .JAR/.AAR Package" and click on "Next" button as shown below:
 Choose the downloaded android-uilib-release.aar file
path in the "File name" field. A "android-uilib-release" name will show
in the "Subproject name" field. Press "Finish" button to finish the
settings.
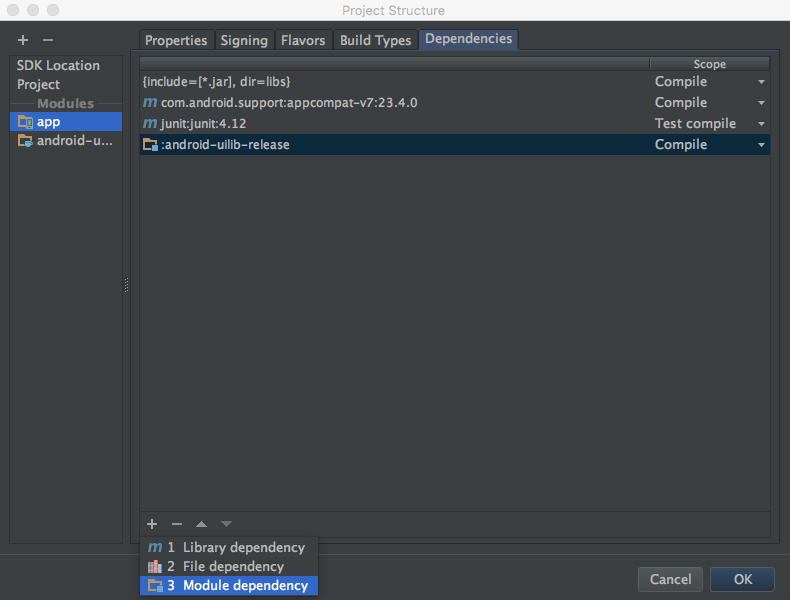
Moreover, right click on the 'app' module in the project navigator and click "Open Module Settings" to open the Project Structure window. Navigate to the "Dependencies" tab, click on the "+" sign at the bottom and select "3 Module dependency", then choose the ":android-uilib-release" module and press "OK". You should find the ":android-uilib-release" appear in the list now.
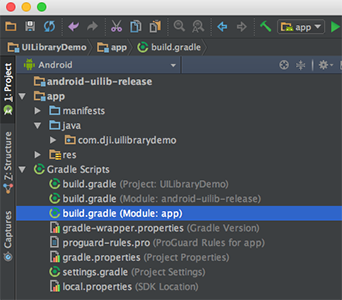
 3. Furthermore, double click on the
"build.gradle(Module: app)" in the project navigator to open it and
replace the content with the following:
In the code above, we update the
4. Now, open the MainActivity.java file and add
Wait for a few seconds and check if the words turn red, if they
remain gray color, congrats! You have imported the DJI Android SDK and
DJI UI Library into your Android Studio project successfully!
In the xml file above, we implement the following UIs:


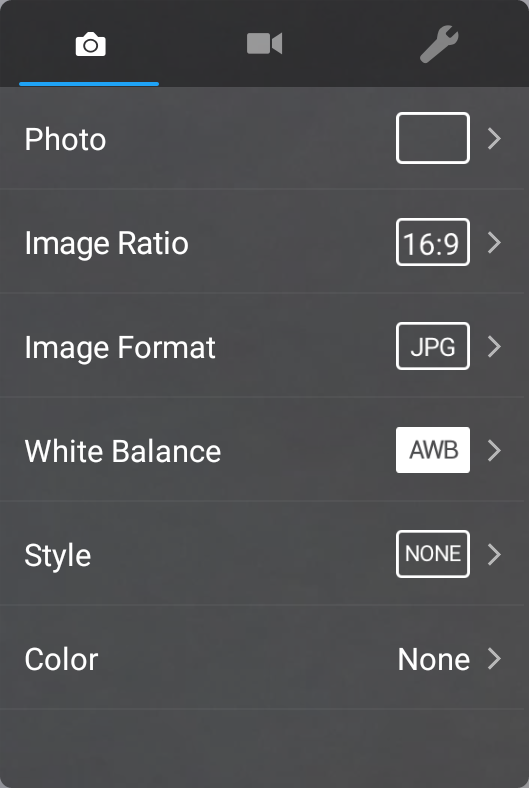
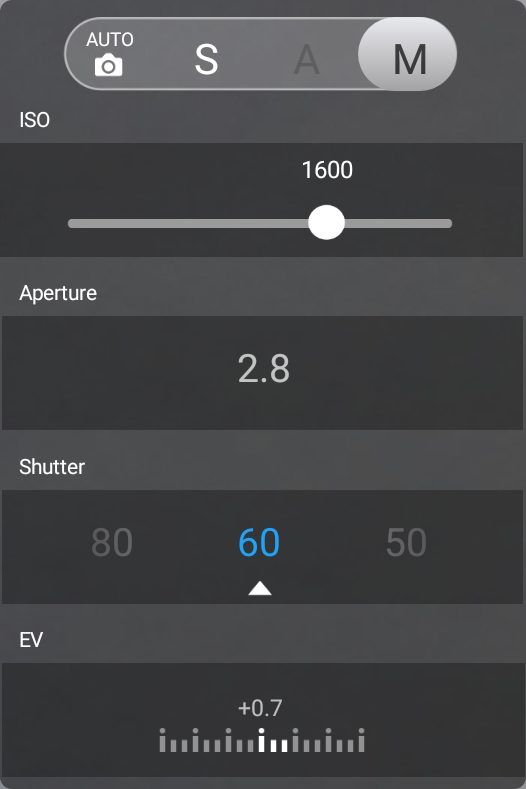
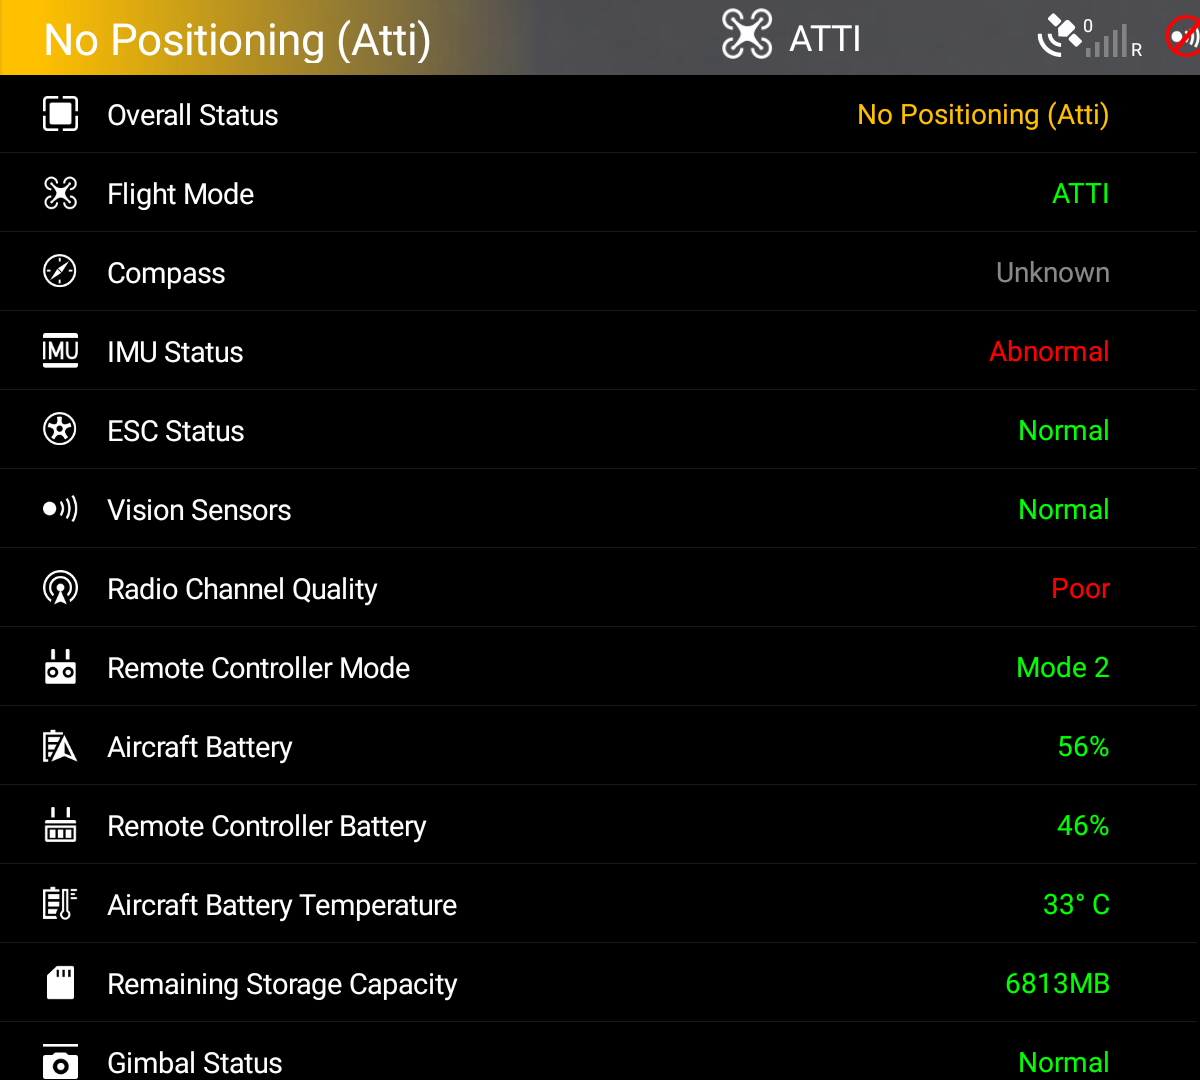 Once you finished the steps above, open the "colors.xml" file and replace the content with the following:
Moreover, let's open the "styles.xml" file and replace the content with the following:
With the help of DJI UI Library, it's simple and straightforward to
implement the standard DJI Go UIs and functionalities in your own
application.
Here, we implement several features:
Here, we request permissions that the application must be granted in
order for it to register DJI SDK correctly. Also, we declare the camera
and USB hardware which are used by the application.
Moreover, let's add the following elements as childs of element on top of the "MainActivity" activity element as shown below:
In the code above, you should substitute your App Key of the application for "Please enter your App Key here." in the value attribute under the
Lastly, update the "MainActivity" activity elements as shown below:
In the code above, we add the attributes of "android:screenOrientation" to set "MainActivity" as landscape and add an intent filter for it.
In the
Now, let's build and run the project and install it to your Android device. If everything goes well, you should see the "Register Success" textView like the following screenshot when you register the app successfully.
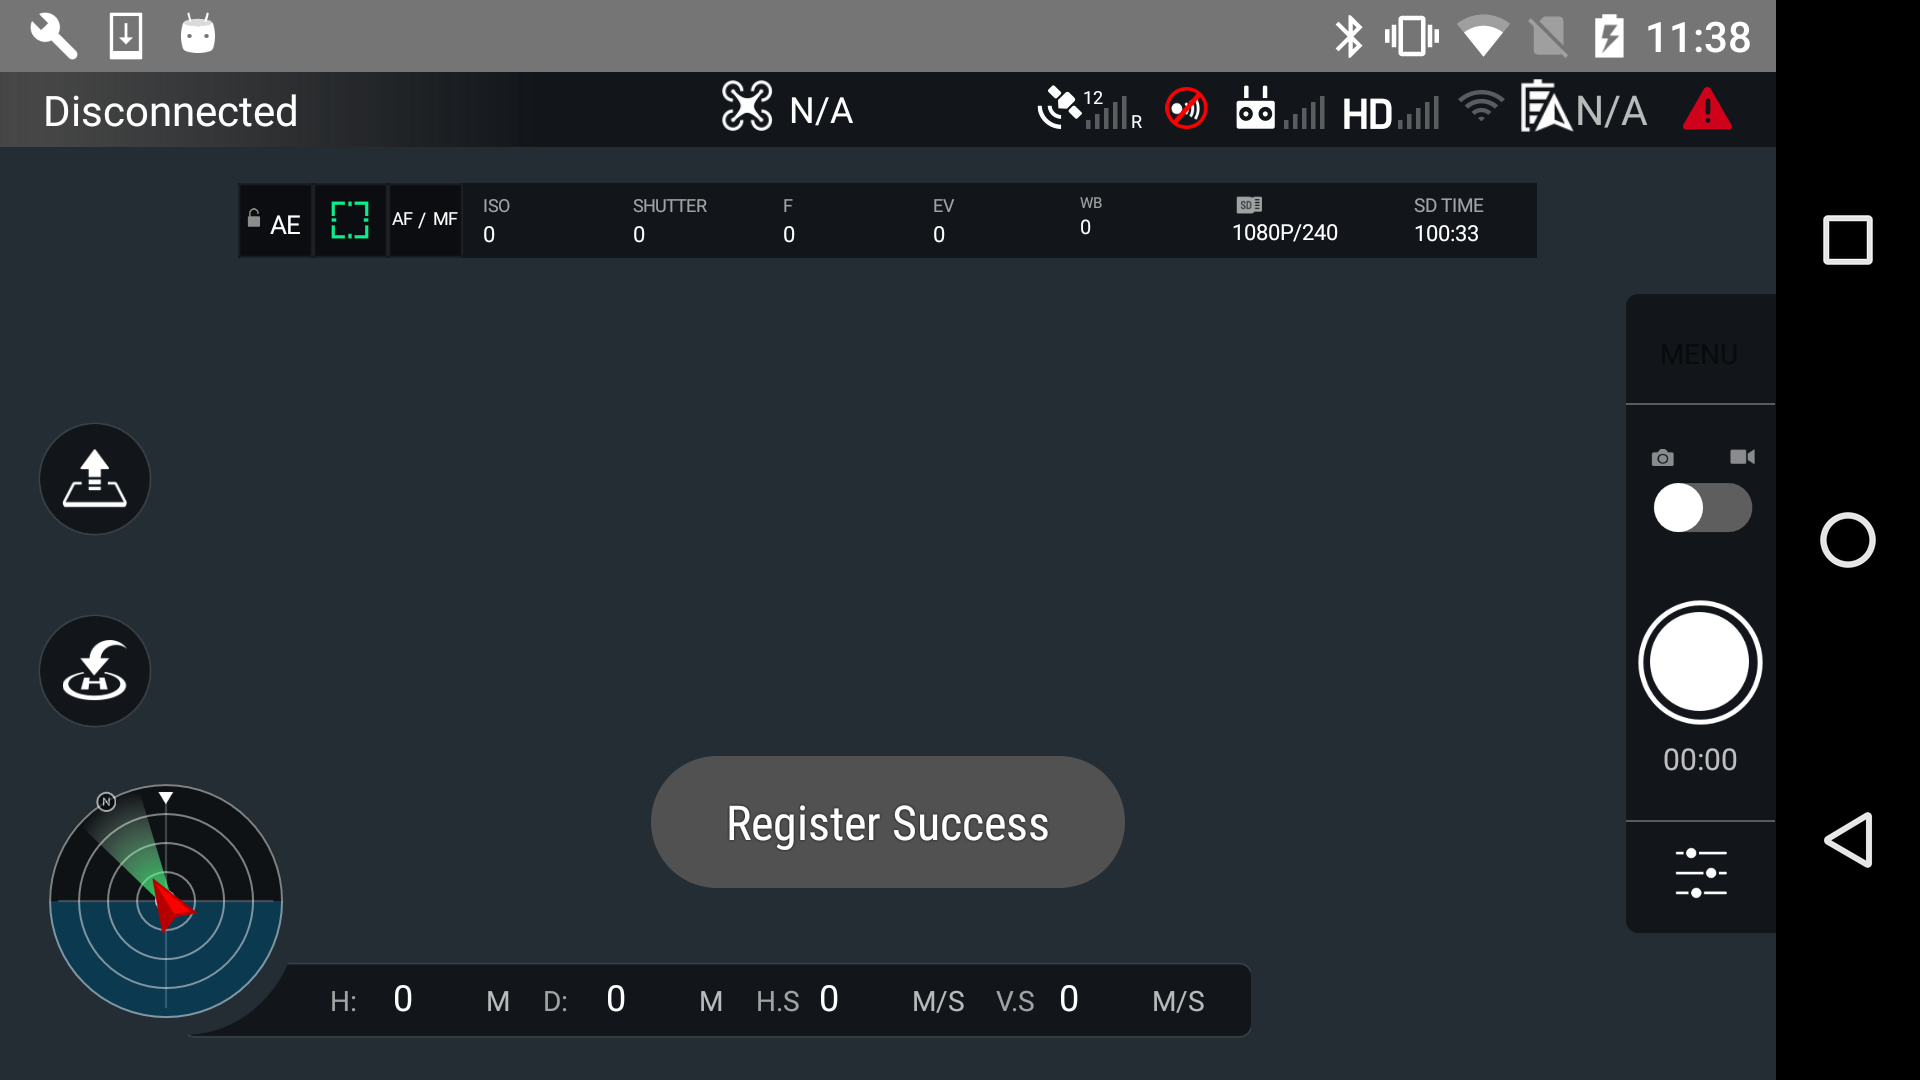
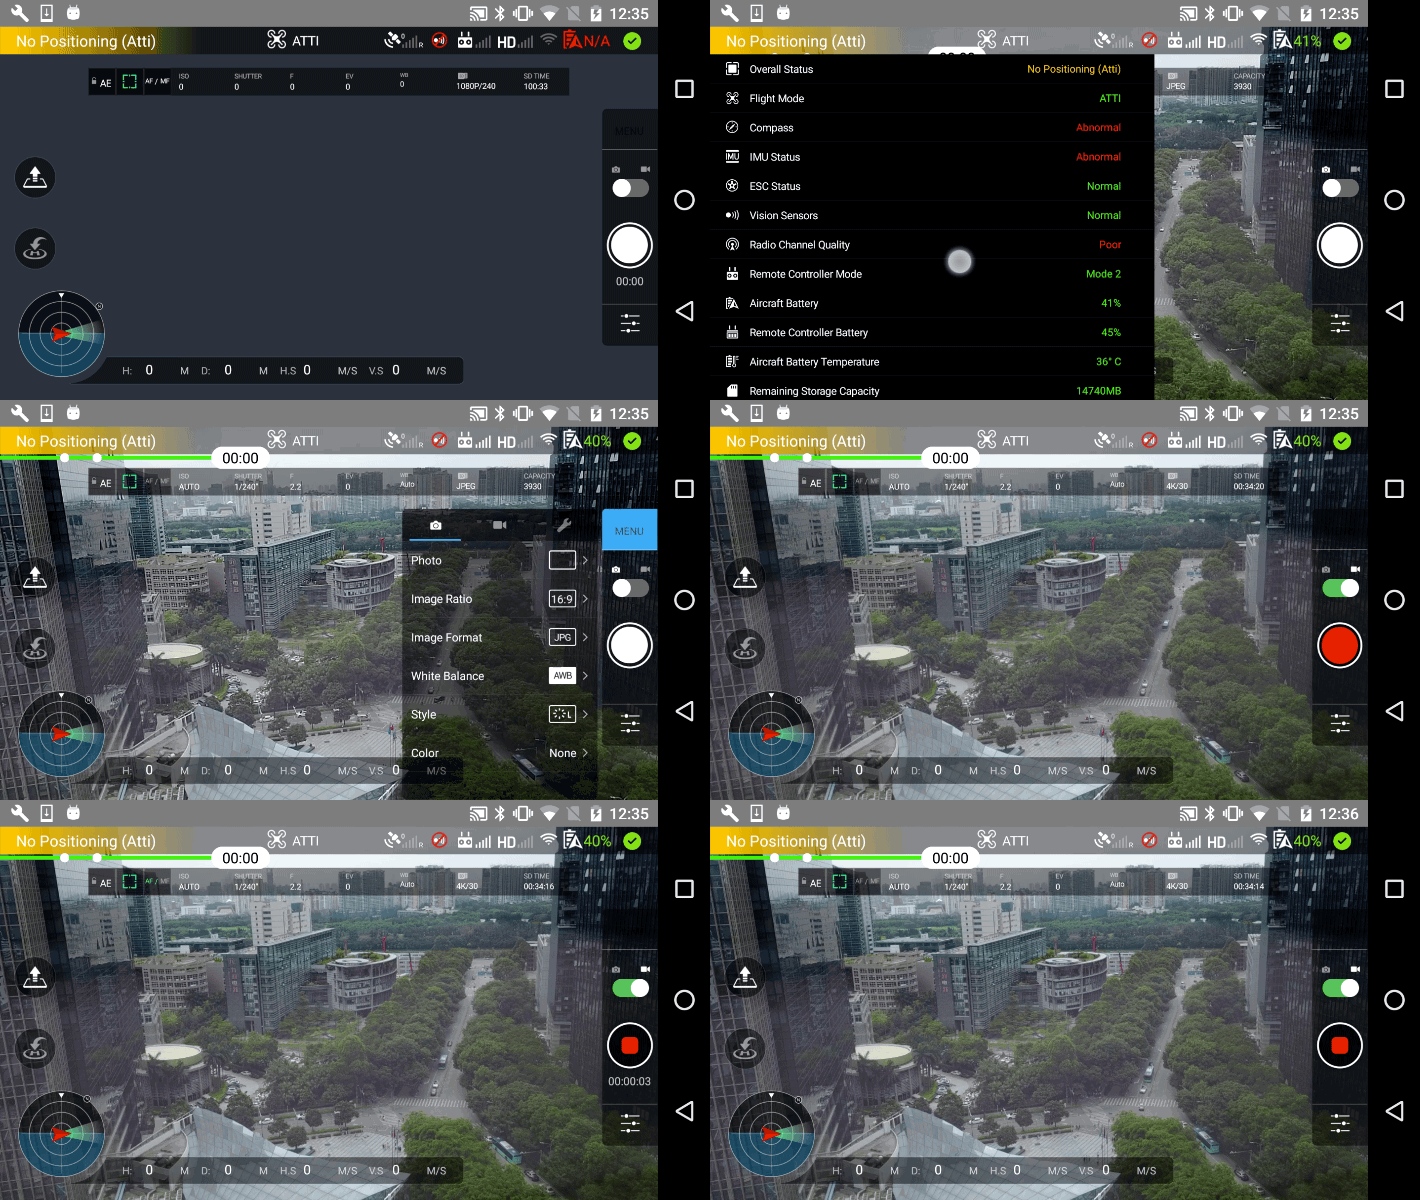
If you can see the live video feed and test the features like this, congratulations! Using the DJI UI Library is that easy.
In this tutorial, you will learn how to use DJI Android UI Library and DJI Android SDK to create a fully functioning mini-DJI Go app easily, with standard DJI Go UIs and functionalities. By the end of this tutorial you will have an app that you can use to show the camera FPV view, check aircraft status, shoot photos, record videos and so on.
You can download the tutorial's final sample code project from this Github Page.
We use Mavic Pro and Nexus 5 as an example to make this demo. For more details of customizing the layouts for iPhone devices, please check the tutorial's Github Sample Project. Let's get started!
Introduction
DJI UI Library is a visual framework consisting of UI Elements. It helps you simplify the creation of DJI Mobile SDK based apps in Android. With similar design to DJI Go,UI Elements allow you to create consistent UX between your apps and DJI apps.Additionally, with the ease of use, UILibrary let you focus more on business and application logic.
As DJI UI Library is built on top of DJI Mobile SDK and VideoPreviewer, you need to use it with them together in your application development.
Importing DJI SDK and UILibrary with AAR file
1. Now, let's create a new project in Android Studio, open Android Studio and select File -> New -> New Project to create a new project, named 'UILibraryDemo'. Enter the company domain and package name (Here we use "com.dji.uilibrarydemo") you want and press Next. Set the minimum SDK version asAPI 18: Android 4.3 (Jelly Bean)
for "Phone and Tablet" and press Next. Then select "Empty Activity" and
press Next. Lastly, leave the Activity Name as "MainActivity", and the
Layout Name as "activity_main", press "Finish" to create the project.2. Next, download the android-uilib-release.aar file from this Github link. Go to File -> New -> New Module on the Android Studio menu:
 Choose "Import .JAR/.AAR Package" and click on "Next" button as shown below:
 Choose the downloaded android-uilib-release.aar file
path in the "File name" field. A "android-uilib-release" name will show
in the "Subproject name" field. Press "Finish" button to finish the
settings.
Choose the downloaded android-uilib-release.aar file
path in the "File name" field. A "android-uilib-release" name will show
in the "Subproject name" field. Press "Finish" button to finish the
settings.Moreover, right click on the 'app' module in the project navigator and click "Open Module Settings" to open the Project Structure window. Navigate to the "Dependencies" tab, click on the "+" sign at the bottom and select "3 Module dependency", then choose the ":android-uilib-release" module and press "OK". You should find the ":android-uilib-release" appear in the list now.
 3. Furthermore, double click on the
"build.gradle(Module: app)" in the project navigator to open it and
replace the content with the following:
|
compileSdkVersion, buildToolsVersion, targetSdkVersion
number, etc. Also, we add the "compile
'com.android.support:recyclerview-v7:23.4.0'" at the bottom of
"dependencies" to add the necessary recyclerview library.
Note: We also remove the compile 'com.android.support:design:23.4.0' in the "dependencies" to avoid getting the following errors:Then, select the Tools -> Android -> Sync Project with Gradle Files on the top bar and wait for Gradle project sync finish.
4. Now, open the MainActivity.java file and add
import dji.sdk.sdkmanager.DJISDKManager; at the bottom of the import classes section as shown below:
|
Building the Default Layout using UI Library
Now, let's continue to open the "activity_main.xml" file, and replace the code with the following:
|
- Firstly, we add the
dji.ui.widget.FPVWidgetanddji.ui.widget.FPVOverlayWidgetelements to show the first person view (FPV).

- Next, on top of the screen, we create a LinearLayout to group the top status bar widgets, like
PreFlightStatusWidget,FlightModeWidget,GPSSignalWidget,RemoteControlSignalWidget, etc.

- Moreover, we create another LinearLayout to group the camera configurations and config widgets below the status bar widgets, like
AutoExposureLockWidget,FocusExposureSwitchWidget,CameraConfigISOWidget,CameraConfigStorageWidget, etc. Also we add thedji.ui.widget.RemainingFlightTimeWidgetelement to show the remaining flight time widget below the top status bar widgets too.

- Below the top status bar, we add a
RemainingFlightTimeWidgetto show the remaining flight time.
- At the bottom of the screen, we add another LinearLayout to group the
DashboardWidget. It includes the circularCompassWidget, theDistanceHomeWidget, theHorizontalVelocityWidget, theDistanceRCWidget, theVerticalVelocityWidgetand theAltitudeWidgetas shown below:

- On the left side of the screen, we add a LinearLayout to group the
TakeOffWidgetandReturnHomeWidgetwhich will be shown as two buttons.

- On the right side of the screen, we add the
dji.ui.widget.controls.CameraControlsWidgetelement to create aCameraControlsWidgetto show the camera control widget. Tapping the Menu button on top will toggle between show and hideCameraSettingAdvancedPanel. Tapping the switch button in the middle will toggle camera mode between shoot photo and record video. Tapping the bottom button will toggle between show and hideCameraSettingExposurePanel.

- To add the
CameraSettingExposurePanel, we add thedji.ui.panel.CameraSettingExposurePanelelement and configure its attributes.

- To add the
CameraSettingAdvancedPanel, we add thedji.ui.panel.CameraSettingAdvancedPanelelement and configure its attributes.

- Lastly, we add the
dji.ui.panel.PreFlightCheckListPanelelement to create thePreFlightCheckListPanel. When user press on thePreFlightStatusWidget, it will show up below the top status bar.
 Once you finished the steps above, open the "colors.xml" file and replace the content with the following:
|
|
Application Registration
Now let's register our application with the App Key you apply from DJI Developer Website. If you are not familiar with the App Key, please check the Get Started.Implementing DemoApplication Class
Right click on the 'com.dji.uilibrarydemo' module in the project navigator and select "New -> Java Class" to create a new file, enter "DemoApplication" as the Name. Then replace the code with the same file in this tutorial's Github sample project, here we explain the important parts of it:
|
- We override the
onCreate()method to initialize DJISDKManager and register the application. - Implement the two interface methods of
SDKManagerCallback. You can use theonRegister()method to check the Application registration status and show text message to inform users. Using theonProductChange()method, we can check the product connection status and invoke thenotifyStatusChange()method to notify status changes. - Implement the two interface methods of
BaseProductListener. You can use theonComponentChange()method to check the product component change status and invoke thenotifyStatusChange()method to notify status changes. Also, you can use theonConnectivityChange()method to notify the product connectivity changes.
Modifying AndroidManifest file
Once you finished the steps above, let's open the "AndroidManifest.xml" file and add the following elements on top of the application element:
|
Moreover, let's add the following elements as childs of element on top of the "MainActivity" activity element as shown below:
|
android:name="com.dji.sdk.API_KEY" attribute. For the "accessory_filter.xml" file, you can get it from this tutorial's Github Sample project.Lastly, update the "MainActivity" activity elements as shown below:
|
Working on the MainActivity
Finally, let's open the "MainActivity.java" file, replace the code with the following:
|
onCreate() method, we request several permissions
at runtime to ensure the SDK works well when the compile and target SDK
version is higher than 22(Like Android Marshmallow 6.0 device and API
23).Now, let's build and run the project and install it to your Android device. If everything goes well, you should see the "Register Success" textView like the following screenshot when you register the app successfully.

Connecting to the Aircraft and Run the Project
Now, please check this Connect Mobile Device and Run Application guide to run the application and try the mini-DJI Go features of UILibrary based on what we've finished of the application so far!If you can see the live video feed and test the features like this, congratulations! Using the DJI UI Library is that easy.


Aucun commentaire:
Enregistrer un commentaire